POLKASOUND PRODUCTIONS
www.polkasound.com


How To Wire a Talkback Box For a Recording Studio

  by Tom Brusky - April 2, 2013

I recently took the plunge of converting my recording studio to a software-based format.  The move really freed up my analog mixer, since I now only need it for tracking, and not for mixing.  With extra mixer channels readily available, I decided to dedicate one to a talkback microphone.
 
The problem I ran into, however, is that simple talkback boxes, like the one I needed, don't exist.  You can buy a foot pedal mute box for stage use or a PA announcer's desktop mic, but as far as simple desktop talkback box with a push-button goes, it seems you're out of luck.  When I realized this, I decided to make one for myself.
 
I found some information online about how to wire the pins, but the information was obscure and fragmented across several message boards.  I created this page so that other musicians can see exactly what they'll need to make their own recording studio talkback box.
 
This article assumes you have experience with building projects like this, and already know how to solder wires and drill holes.


 Items you will need:


A cheap microphone
 
My suggestion for this particular talkback box would be a dynamic mic, and not a condensor or any kind mic that requires phantom power, since powered mics can induce an audible "pop" when they are muted/unmuted.  The cool thing is that the cheapest, crappiest-sounding mics often make the best talkback mics because they give your talkback system that classic, hollow "intercom" sound.  You can purchase a bottom-of-the-line vocal mic new for under $20.


Two XLR mic cables
 
You'll need one cable to connect your microphone to the talkback box, and a second cable to connect the talkback box to your mixer.  I puchased two 3' Hosa mic cables (shown at left) from Amazon.com.


A project box

 
You can find these at your local Radio Shack or buy them online.  The one I used was Radio Shack's 5" x 2.5" x 2" box.
 
The push-button switch will mount into the top of the box, and the two XLR panel jacks into one of the sides.  I used a Dremel to make the holes.


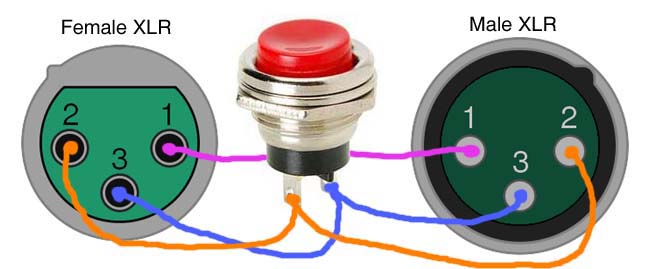
A female panel-mount XLR jack

 
These are easy to find.  You can get them at your local Radio Shack or buy them online.


A male panel-mount XLR jack

 
You probably won't find these at your local Radio Shack, since they are not as common as the female jacks.  You can easily find them online though.  I bought mine on Amazon.com.

A momentary, normally closed, push-button switch
 
Getting the right kind of switch is important.  The switch you want is both momentary and normally closed (also referred to as "normally on").  You can find momentary, normally-closed switches at Radio Shack, but they are very tiny.  A regular-sized switch is relatively rare and hard to find, but you can find them online.  I bought this one on Amazon.com.
 
Amazon link: Momentary N. C. Panel Mount Push Button Switch


Wiring:
Wire the XLRs jacks together, via the switch, as shown.  Connect both Pin 3's to one of the switch posts (doesn't matter which one.)  Then connect both Pin 2's to the other switch post.  Then connect the Pin 1's together directly.


Explanation: When the switch is in the upright position, it connects the orange and blue conductors together which mutes the microphone.  When you press the button down, the orange and blue wires disconnect from each other which then un-mutes the microphone.


  Finished Product:

 
All written content copyright 2013, Polkasound Productions, Milwaukee, WI